sirchode
Jun 25, 2004


This thread is primarily aimed at those of you who picked up Vagrant Story and tried to play it only to get completely confused by the weapons system and ended up doing 0 damage to a boss a couple hours in. The game unfortunately doesn't document its own mechanics very well, so the majority of people that played the game ended up hating it and this is a crying shame.

So what we're going to do is talk about the game mechanics and try to provide as much detail and documentation as possible for anyone that has always wanted to give it a second chance. The game was produced and directed by a guy named Yasumi Matsuno, and this is the same Matsuno that primarily led the development of Final Fantasy XII. If you enjoyed FFXII, you'll most likely also enjoy VS quite a lot. So read through the advice here, let it sink in, read it again, and play Vagrant Story dag nabbit.

Special note! I am not an "expert" on this game, I just understand it well enough to love it. I want more people to enjoy the game, hence the thread, but there are many people here that have much more experience and can provide better insight, so keep reading!

First things first...


>>> The Basics


Vagrant Story is all about your weapons, it's a weapon-based game and your weapons are the most important part of the game so remember that everything revolves around your weapons weapons weapons weapons. Have your brain block out the traditional character- or party-based ideas that RPGs have been using for years because you will screw yourself otherwise. Your character's strength is a drop in the bucket compared to the importance of using the right weapon at the right time on the right enemy class. Read that over and over again until it sinks in.

There are six different types of enemies in the game: Human, Beast, Phantom, Undead, Evil and Dragon. Your goal is to be able to have one weapon for each enemy type, and this weapon will be used exclusively on that enemy type. Yes, this requires switching weapons two or three times per room and no there isn't a quick weapon switch in the game, even though there are buttons like R2 which are completely unused. This is one of the only downfalls of the game but just grin and bear it since it's incredibly rewarding.


>>> The Weapons


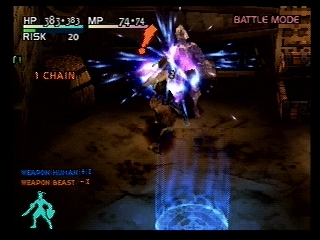
It's almost as if your weapons are alive in this game. They react to the enemy they attack and gain affinities based on that. The very first thing you must do when you start playing the game is go into the options menu and enable the Weapon Status indicator. This is what will help you understand and visualize the entire weapons system and they should have enabled it by default. With this indicator enabled, go and attack an enemy and in the lower-left corner of the screen you'll suddenly see how your weapon's affinities changed based on that attack, it usually looks something like this:

Weapon Beast +1
Weapon Dragon -1
Weapon Evil -1

What this means is that your weapon gained an affinity towards Beasts (assuming you attacked a Beast), and it lowered its affinities towards Dragons and Evil. The weapon will now do even more damage against Beasts and even less damage against Dragons and Evil enemies. If you kept this same weapon equipped and went around attacking Undead, you'd end up lowering the weapon's Beast affinity in favor of Undead affinity. This is where most people get confused since it's pretty standard in an RPG to use the same weapon for a long period of time, but in Vagrant Story this habit will only produce a weapon that is really ineffective against all enemy types. If you have your Beast weapon equipped and you come across a Phantom, get in there and switch weapons or you'll lower the weapon's Beast affinity and you'll really regret it the next time you come across a Minotaur.

The weapons themselves consist of two separate and interchangeable pieces: The blade and the grip.


Blades come in many different types: one-handed sword, two-handed sword, one-handed axe, one-handed mace, polearm, dagger, etc. In addition to this, blades also have one of three characteristics: Edged, Blunt or Piercing. These characteristics are pretty self-explanitory: A Blunt blade would smash like a baseball bat, a Piercing blade would be like a lance and an Edged blade would have an edge. This plays into the enemy types and we'll discuss this shortly.

Grips also have categories: a certain grip can only be attached to certain blade types. In addition, grips are also designed for certain blade characteristics, for example a particular grip might fit Axes/Maces/Staffs but it has an Edged rating of 10 whereas its Blunt and Piercing ratings are 2 and 3. Obviously, then, this grip would be best suited with an axe blade. Grips also have up to three slots for gems, which we'll discuss later.

So now you ask, "But how do I know which weapon type to use on a particular class of enemy?" Mostly logic I guess, but it's not exactly cut-and-dry. Humans bleed to death so get an Edged weapon in there, same with Beasts. Dragons have scales so you have to pierce them. Undead are just bones so use a Blunt mace to smash the bones. Evil and Phantom vary depending on the actual enemy but Edged is the most versatile blade type so that's always a safe bet.

Also keep shields in mind, they can only be equipped when you're using a one-handed weapon. Shields are a great way to increase your defense and they also allow you to equip gems, which is crucial when fighting Phantoms (again, we'll talk about this later but keep it in mind when dealing with your weapons).

Now, if you're looking for some guidelines as far as which weapon to use on a certain class, here's something to get you started (Note: this is very disputable and everyone plays differently, there really isn't a "best" weapon for most classes):

Human - Two-handed axe
Beast - One-handed sword (crossbow is also a good option if you can get it strong)
Phantom - One-handed axe (you want to be able to equip a shield when fighting Phantoms)
Undead - One-handed mace (two-handed mace might be better though)
Evil - Two-handed sword
Dragon - Polearm

So that's the main chunk of the game, the weapons system. If something doesn't make sense to you, read it again and post questions if it's still not clear, we're all more than happy to help. With that out of the way, let's talk about the other important things in the game:


>>> The Workshops


Workshops are where you create new weapons by combining your existing blades and grips. When at a workshop, go to GameFAQs and pull up the Combinations Guide. Look at the blade of one of your weapons, find it in the guide, and see what you can make with the other spare blades you've acquired. Basically just try to make a roadmap for your weapons so that you can continue to improve them without screwing something up. I managed to get a Hoplite shield on my first playthrough simply by carefully tracking which combinations yielded which results and planned accordingly. It's a very cool feeling once you are able to stomp any enemy in the game after all that hard work.

When you combine your blades, you'll get to see a little preview of what will come of the combination, be sure to take a look at all this beforehand and ensure you're getting a better blade out of the deal. Also what's cool is that your best enemy affinities will transfer over to the new blade so you don't have to worry about training your blades over and over again.

As far as materials go, you'll want to shoot for Hagane on your first playthrough since it's really well-rounded and can be combined in almost all of the workshops in the game (Hagane can be obtained by combining a Bronze item with an Iron item). Honestly I wouldn't worry too much about materials, just make the best equipment you can. Also, always repair your weapons when you're in a workshop, always. Your weapons are at their best when they've been freshly repaired.


>>> The Combat


Combat is pretty straightforward. When you initiate the combat dome (the size of which varies depending on the range of your weapon), you can choose to attack an enemy in specific locations for varying degrees of damage and success rates. You'll notice some information about the enemy at the bottom of the screen, the most important parts are the right-most stats: Damage/Success on the top line, and then to the right of the bottom line, Enemy Type (which tells you which of your weapons you should be using). If you're going to attack an enemy's head, you might see something like 23/98%. This means that you have a 98% chance of hitting the target and that you'll do somewhere around 23 points of damage. If you then point to the enemy's body, they might have armor or they might be in an awkward position which could make those numbers change to something like 2/41%. So, go for the head!

Magic is a lifesaver in combat so don't forget to cast some if you're finding yourself in a jam. The Fusions, the Guards, Magic Ward, Herakles and Prostasia will all become your best friends throughout the game since they have such a tremendous impact on the damage you deal. For example if you're fighting a Fire Phantom, cast Frost Fusion on your weapon, Pyro Guard on yourself and Prostasia or Herakles on yourself and you'll be doing 500% more damage and receiving 50% of the damage you were without all that. Add gems into this mix and you will be pretty much unstoppable.

Be careful, though, you can only have three total spells cast on yourself at once: One on your weapon and two on yourself. Casting a new magic spell will override previous spells and you could waste some MP so watch out.


>>> Chaining and Risk


One of the key parts of the game is chaining. Once again go into the options and enable the Timing Display indicator. With this indicator enabled, you'll see an exclamation mark appear over Ashley's head when the next button should be pressed. I need to make this as clear as possible: When you see the exclamation mark, your thumb should be pressing the button. The exclamation mark is not an indicator of when to begin moving your thumb. Your button presses should be synchronized so that you're seeing the exclamation mark as you're hitting the button. It takes a bit of practice and getting comfortable with the various moves, but you'll be able to chain to infinity in no time.

The drawback to chaining is that it increases your Risk, and this is where you get your first glimpse of the game's balancing act. The effect of Risk is twofold: It decreases the likelihood of a successful attack but it increases the likelihood of a critical hit. Risk is not calculated into the x/x% number so you'll need to do some mental adjustments to take it into account. Risk is pretty cool because it prevents you from just chaining away at a boss or enemy without any repercussions. You certainly could chain to 50 hits on a Wyvern but the second you mess up you'll have full Risk and the chances of you connecting another hit before the Wyvern attacks is slim to none. The moral of the story is to never chain longer than you need to, usually about 4-6 chains is plenty. Break the chain and start over again to keep your Risk as low as possible while dealing as much damage as you can.

The interesting thing about chains is that the damage you deal increases slightly with each hit so you can theoretically kill any enemy, even if you start at 0. This is very dangerous and time-consuming, however, and should only be considered as an absolute last-ditch effort.


>>> The "points"


If you take a look at your weapons, you'll notice they have other point values associated with them: Damage Points and Phantom Points. Damage Points are basically an effectiveness meter, more DP means the weapon is more effective which means it simply deals more damage. As you use your weapons, their Damage Points will slowly decrease, which decreases the amount of damage they deal.

Phantom Points, on the other hand, seem to have everyone confused and there is a lot of conflicting information regarding them. Some say PP is only for the Phantom Pain move, some say they increase the likelihood of critical hits, some say they are a stat boost for weapons when full... Anyone know for sure? In any case, Phantom Points are a good thing and they accumulate as you use your weapons.

You can fully restore your weapons' Damage Points by simply repairing them in a workshop, however, repairing uses up all your Phantom Points (there's that balancing act again). In the end, DP and PP aren't really crucial need-to-know mechanics so just keep your weapons repaired and you'll be fine.


>>> The Gems


Gems are pretty straightforward, each gem has certain benefits and modifies your stats/affinities how you see fit. Just equip the appropriate gems depending on what enemy a particular weapon/shield is being used against and you'll notice a big difference.

One thing I need to make a hullaballoo about, however, is this: Gems are crucial against Phantoms. Most Phantoms in the game have a strong elemental affinity and the only way you'll be able to deal any sort of significant damage to them is by using magic and gems, period. The first time I fought the Fire Elemental Phantom I ended up doing the chain-from-zero tactic simply because I was unprepared and didn't know these mechanics as well as I do now (I actually think I had an Air gem equipped which I didn't even realize until later). So be warned, you can really get into a pickle if you're unaware of this stuff.


>>> Miscellaneous


-Each room has a different name, go through and look at them some time and you'll appreciate the atmosphere and sense of history

-There is a New Game+ feature which lets you restart the game while retaining all your old weapons and stats from the previous playthrough. You can really feel invincible if you play through the game and absolutely cream everything in your path, it also helps you to watch the story unfold quicker.

-This page (archives) in the old Final Fantasy XII thread is chock full of great advice and discussion on the game which inspired this thread. Good stuff therein.

-Personal thanks to Mrs Badcrumble who was my VS mentor and held my hand through the game, XOXO

sirchode fucked around with this message at Dec 15, 2006 around 15:54

sirchode
Jun 25, 2004


>>> General Tips


-Use the grimoires right away, they teach you magic spells! They aren't rare items like Ethers!

-A Dragon's deadliest attack is its breath and it'll really work you over. The good news is that it can't use its breath on you if you're under its head, so get under there as fast as you can and start attacking its legs or neck.

-The last boss is a completely different enemy type and requires a unique strategy. I'll let someone else explain further because I only beat it with sheer dumb luck.

-Don't spend too long on the later box puzzles, they get ridiculously hard near the end.

-Oh, and USE STATUS SPELLS. You know how status spells suck in FF and direct damage is everything? Yeah, not here. Direct damage is horrible, but a well timed tarnish/degenerate combination will turn a fearsome opponent into Stephen Hawking. (Thanks Nomenklatura)

-The best advice is can offer for Vagrant Story is to not be afraid to take things slow and switch weapons FREQUENTLY through the menu screen. This game takes time upon time upon time and you can't be afraid of it. (Thanks Sloth Socks)

-I think there's one small bit of advice I can give, since the general bases have been covered - when all else fails, REFLECT. (Thanks anderton)


>>> Goons Helping Goons (tips from the last thread)


A killer workshop reference assembled by Extra_Thumbs:

Extra_Thumbs posted:

An explanation on weapon pairing:

Nomenklatura posted:

The best way to look at Vagrant Story is to think of it as something like an strat-RPG. Since Ashley doesn't level, but his weapons do, you have to treat the weapons like you would soldiers in an strat-RPG: figure out what role you want them to play, how specialized you want them to be, and be sure to use them all so that they all get levelled up. You CANNOT rely on a single weapon in Vagrant Story any more than you can rely on a single soldier in FFT, and trying to do so only leads to the "why the hell is my weapon only doing one point of damage" situation. There's a reason why the forge figures so prominently in that opening FMV- Vagrant Story is about weapon (and to a lesser extent armor) design, and you need to keep that constantly in mind.

Anyway, here's a breakdown:

Three main types of weapons: edged, piercing, blunt. Six types of affinities: Beast, Phantom, Human, Evil, Undead, Dragon. A bunch of elemental affinities, which I won't get into.

Each type of weapon tends to be better against a particular type of baddy, except for humans that wear different kinds of armor. Beasts and Dragons hate piercing weapons, for example. Different types of weapons (crossbow, sword, rapier, whatever) tend to be better with different types of critters, but it breaks down into those three groups. So the rule is to find the right kind of weapon, and start giving it the right pair of affinities.

Pair? Yep. Listen close:

here are the types of critters in order:

Human.
Beast.
Undead.
Phantom.
Dragon.
Evil.

When you club something to death, your weapon gets "experience". The thing is, it ALSO can LOSE experience to whatever is BELOW that critter on the list.

Let's say you kill a soldier. Your sword gets a +1 to human. Great..except that it also gets a -1 to beast. You kill a beast, beast gets a +1, but it gets -1 to Undead. And so on, and so forth. It CAN also go +1 human, -1 undead, but it's kind of unlikely, and -1 phantom doesn't happen.

(The list wraps around... kill some evil, lose some human.)

So, the practical upshot is that you pair things that aren't likely to pull away from each other. That's why Human-Phantom/Beast-Dragon/Undead-Evil works- they're unlikely to -1 from each other. You CAN go Human-Undead-Dragon and Beast-Phantom-Evil, and it'll still work, but it's not as useful.

(As for elemental affinities, screw 'em- you get gems with those. Just add and subtract the gems. You should get proper affinities by fighting the right pairs anyway.)

Do a quick scan of the baddies in the room when you enter it, grab the right weapon, and go to town. When you find a new weapon, check the synth lists (screw experimentation), and synth it onto the one you've got.

And remember- when you're looking at ashley's affinities in the status screen, you can switch to the other guys using L1 and R1. You can learn absolutely EVERYTHING about the guys you're fighting. No excuses.

Take heart in the fact that it's still easier than the Legend of Mana weapon system, though. THAT thing was insane. Makes Dark Cloud 2 look like a Final Fantasy.

And a friendly counterpoint:

Mrs. Badcrumble posted:

pairing CAN work, but due to blade types and whatnot you're better off not pairing. like, you should have a Blunt Undead weapon and an Edged Evil weapon. you COULD pair those two but it would suck. 6 weapons is way better than 3 really

Another take on pairing:

Seth Huber posted:

Another problem with pairing is that enemies of the same type aren't always weak to the same weapons. Evil especially has this problem, they're all over the place in everything from damage resistance to elemental affinity. Undeads are about half weak to blunt and half weak to piercing. Also having a Human/Phantom sword doesn't make a lot of sense because Phantoms are mostly weak to blunt (although you have to pretty much always use elements against phantoms). The big determiner in how much damage you do isn't your enemy affinity but your weapon's edged/piercing/blunt status. Enemy affinity is somewhat important in the early game, but mostly something you mainly worry about once you get access to the dummies. The main use of only having 3 weapons is that you don't have to switch so damn much (why the hell didn't they include a weapon switch on the quick menu instead of the useless usable items?!?!)

A theory on PP/DP:

Nomenklatura posted:

Phantom points increase damage. Every time you use a weapon to kill something, it gets phantom points, but it also LOSES durability. If you've got full phantom, it does double damage... but if you repair it, all the phantom points are gone.

So the trick is to have weapons regain durability by using the right combo tricks, rather than straight repairs. Figure out how to chain that durability-building ability and spam it.

Final boss strategy:

Valvados posted:

I'll chime in here because I've honestly never really had that much of a problem with the final boss. He hits hard as hell, but if you know what you're doing you can negate almost every single one of his attacks.

This strategy takes a lot of time to execute, but once I started using it, I have never once lost against the final boss. It also avoids cheesing him to death with Phantom Pain (besides, on my first time through the game, I hadn't gotten that particular ability yet).

I'll try and make this as spoiler free as possible, too.

Here's what you need for this strategy:
1) A good, strong 2-Handed Great Sword with a high Evil-class and Light-elemental affinity that will hold 3 gems
2) A good, strong shield that will hold 2 gems
3) Demonscale (Defense Chain)
4) Magic Ward
5) Demonscale
6) Herakles
7) At least two Demonia gems
8) One physical damage enhancing gem, like a Titan Malachite
9) Demonscale, motherfucker! If you don't have it, go get it. NOW!

Aside from the shield and Great Sword, just wear the best armor that you have gotten so far. The armor that got you through the  Grand Cathedral  really should be more than enough. The whole idea behind the final battle is to not get hit unless it is absolutely unavoidable, so your armor doesn't really matter as much as you might think.

You should not have any trouble at all with the first form of the boss. If you can't fap, you are nowhere near ready to take on the second, final form. Just stick the Demonia and the Titan Malachite on the Great Sword, fuck it over with a few chains, and watch the pretty cutscene.

Here we go.

At the very beginning of the fight, do three things. First, get to the center of the circle; he can't hit you there. Second, HEAL YOURSELF! Any damage you took in the first fight isn't automatically erased, IT CARRIES OVER! So pop a few Nostrums, get your HP and MP full, and your Risk down to 0. The third step really depends on how many Demonia gems you have. If you only have 2, put them on the shield. If you have more than 2, put 2 on the shield, and put the others and the Titan Malachite on the Great Sword. Equip the shield.

Now we're ready to start.

This boss has a very predicatable pattern to begin with. He'll fly around like a spaz and then pick a random spot on the outside of the circle to stop. DON'T CHASE HIM. Wait for him to stop. While he's flitting around, cast Herakles on yourself, and then Magic Ward. For the love of God, don't cast Magic Ward first, because then when you cast Herakles it'll negate the ward and you'll have wasted a bunch of MP. Anyway, Herakles, then Magic Ward. By now, he should have settled down. Run over to him. On your way over, he will cast a spell. Magic Ward will absorb it. You are now still at full HP instead of 3/4 dead.

When you get to the edge of the circle where he is, open up the menu. Unequip the shield and equip your Great Sword. Transfer the Demonia from the shield over to the sword so that it has two Demonia and the Titan Malachite on it. Get out of the menu.

Open up your battle sphere, and target his head. Chain together four, five attacks at most. NO MORE. You CANNOT let your Risk get high at all in this battle. If you can't reach the head, go for the arms. Don't bother with any other body part. Don't bother with trying to be fancy with shit like Break Arts, because they deplete your HP and you want it to be at maximum at all times.

As soon as you finish attacking, open the menu again. Transfer the Demonia back to the shield and equip the shield. Run back to the center of the circle. If he managed to hit you, heal with an item. Use an item to lower your Risk to 0. Recast Magic Ward. Wait for him to settle on another part of the circle, and repeat the process. Run up to him, let Magic Ward absorb the spell on the way, transfer the Demonia to the sword, attack four or five times, transfer the gems back to the shield, run back to the center, heal, recast Magic Ward, etc. Recast Herakles as it fades (it should last through 2 or 3 cycles of this attack pattern). Use items to retore your MP as needed.

So why the fuck are we even bothering with the shield?

Two words: Bloody Sin.

After you knock around half his HP off (250~300ish), he will hit you with his uber-attack. If you are not ready for it, Bloody Sin can and will cause upwards of 500HP of evil-class damage. No, it doesn't matter to the game that that's probably about 150HP more than Ashley's max at this point.

But it doesn't matter, because we're going to be ready for it.

After you deplete half his life, instead of starting to flit around the outside of the circle, he'll start flying overhead. This is why you take the precaution of reequipping the shield and filling it with Demonia immediately after you finish attacking. You want as high of an Evil defense rating as you can muster.

You do have Demonscale equipped, right? Cool. Just checking.

You'll see a bunch of cool graphics. Green-white energy starts flying around Ashley like he's in some kind of weird bukakke ritual and is about to get a very unwelcome facial. Speaking of facials, watch for the camera. It zooms in right on a close-up Ashley's face. An exclamation mark chain indicator will come up at this point! Use Demonscale!

With any luck, with the shield equipped, and if you got off Demonscale, you should have taken less than 100HP damage from what can easily be an insta-kill attack.

Toss back a Nostrum, keep up the original attack pattern, and the final boss should fall without much trouble at all. Isn't preparedness a good thing?

This is how I finally ended up beating the last boss, I was getting raped (emphasis mine):

Mrs. Badcrumble posted:

Actually, with the Bloody Sin attack, you can cancel it entirely. :cool:

Before the final boss executes Bloody Sin, it'll fly up into the sky. After that, it'll zoom directly overhead the battle arena, and when it reaches the end of it it'll immediately cast Bloody Sin. If you manage to attack the boss while it's flying over the arena, you'll cancel Bloody Sin entirely. It's pretty easy to do that, too, what with the shortcut menu essentially allowing you to advance the battle frame by frame until he's within attack range, after which you can drop a Break Art on him (since it's got such nice range and you can't do a regular attack out of the quick menu).

Interrupting Bloody Sin is a HUGE lifesaver and a timesaver to boot.

A bunch of random, helpful information:

Gatts posted:

My suggestions would include Break Arts. Please, they can do a lot of damage when appropriate and are worth the risk. If you are quick with the fingers you should be able to get 3-4 break arts in, a heal, before the enemy takes action. You can tell what the enemy is doing when the bubble over the head is "..." vs "!" which is when he's going to act.

Make use of the chest. Save as much as you can for items, making use of the Save Chest so you can experiment with item forging/combining unless you wish to use a FAQ. Personally, I'd say just save yourself the time and use a Combining FAQ. Save as much Vera Roots/Bulbs you get and if possible harvest as many as you can for later use. Keep in mind, despite the appearance that Ashley is wearing assless chaps, he does have armor on. And the armor is affected like a weapon. The more a certain type of enemy beats on you or does elemental damage, its stats will change accordingly. If you use your fists (as I did on second and third play throughs), then your gauntlets also change affinities like a weapon.

Wines. If you really want the best effect, consider this, you can save and then drink a wine which will give you a +1-4 of a Stat. Granted Stats aren't exactly the most important contributor to what you do, they can help. Like DEX with height and distance jumps. If you get a +1 and have just saved, then restart until you get a +4 if you have the patience.

Make use of the quick menu button. It'll give you time to pause and react to something that might be fast moving while having the option to open menus like for magic or such. Especially during the Bloody Sin attack of the last boss. Hold it down during the animation then you'll have it whipped out when it'll give you the chance to guard it, quickly hit start, then you can get into the menu and equip a shield to reduce the damage.

The Map is the best I've experienced in a game as is the Beastiary and Status screen. Use them. When you encounter an enemy, go to the status screen, see Ashley, and press L1 or L2 so you can see what they have on. Like a rare item or new acessory or something. This way you get an idea of what might be available if you kill the guy and possibly get the item.

Acessories and gems really help. Also, it's neat to see each weapon in Ashley's status screen since the type it is made of changes the appearance and every type of weapon is unique. Damascas has a different color and appearance to silver. During cutscenes what you have out will be on display, enter a boss battle with an Axe, and it'll show. Have it sheathed and you'll enter walking unarmed.

There are a lot of details. Well, that was a hodgepodge of things. I hope more play the game and ask questions.

EDIT: I like to think the Iron Maiden B3-Exit is like a venture through Hell.
EDIT 2: Also, depending on the stats on your weapon, it'll be given a special title. Like if you have +50 in Humans and +50 in Elemental Affinity or +100 and +100.
EDIT 3: You can get enemies to fight each other and help you. If you can position them so one enemy hits them instead, they can start attacking your enemy and will aid you. I think even the icon changes to a heart over their head but am not sure. It's been years since I've played this.

There is a ton of extras and details. Especially on second play through.

This is something I really want and I'm hoping the PS3's game save swapping allows me to experience:

Aeon posted:

I remember making a weapon with 100 in all enemy and elemental affinities. To do so, you need 3 of the same weapon so that you can combine them later on (I used the Rhomphaia, the special one-handed sword in the deepest part of the Iron Maiden). What you do is work on 2 types of enemies and elements per blade, and at the end you can combine them all to make a godly weapon. Then throw in three of the best gems and you are unstoppable.

There's a faq for this on gamefaqs, and even though it's tedious it makes any future playthroughs MUCH more enjoyable because you don't have to worry about the weapon system anymore and can instead focus on the amazing story, characters, and scenery.

One notch below ultimate weapon:

sonic spectre posted:

If you want a "quick" superweapon, go for the Hagane Destroyer (2-hand blunt). A Damascus Holy Win only beats it by one point of STR (Destroyers have higher base STR if all else is equal), and is much more difficult to attain, much less train to max affinity (you'd need at least 3 of them to drop). You can get Mjollnirs and Grievers to make the Destroyer off of Crimson Guard guys near the end of your first playthough. Holy Wins also have greater range and less risk use, but both weapons are gonna demolish anything you meet in a couple hits at most, so it doesn't really matter.

sirchode fucked around with this message at Dec 15, 2006 around 16:36

sirchode
Jun 25, 2004


>>> Goons Helping Goons (tips from this thread)


Random stuff:

Selane posted:

You didn't mention the defensive properties of Risk, only the offensive ones. It has the two offensive effects you mentioned(increasing miss rate and increasing crit chance). Defensively, higher Risk increases the damage you take and increases the amount of health you restore with healing spells.

Also, the optimal chain length is 8. That's the secret answer, remember "8". Risk goes up at a weird, irregular rate during chains. It's something like 1, 2, 3, 4, 5, 6, 7, 8, 13, 22, 35, 50, etc. So by stopping every chain at 8(preferably sooner rather than later if its not going to be exact) you get the most damage you can out of the least possible Risk.

As was mentioned, the easiest weapon system is Dragon/Beast, Human/Phantom, and Undead/Evil. If you can't remember which is which don't forget that you can name your weapons. Feel free to be lazy and name them dragbeast and shit.

Silver weapons you find(find being the key word here, not build) tend to already have highass Evil and Undead stats, so they make good starting points for those weapons.

As for Phantom Points, they increase the effectiveness of your equipment. It's true that you lose them when you repair, but you can regain full PP in MUCH less time than it takes to wear out a weapon again. Therefore you should still repair every chance you get.

Moving along, one combo you should remember is Crimson Pain/Raging Ache. Crimson Pain deals extra damage at the expense of doing damage to you. Raging Ache deals damage equal to 10% of the health you're missing. So if you're missing 200hp it does 20 damage per hit. That's not a lot, but it IS reliable damage that is guaranteed to work on everything, regardless of your stats, or your weapon's class, affinity, or type. If all else fails you can always kill something using this combo, or Raging Ache alone.

Always put your weapon away when you're done fighting, you regen twice as fast.

More various tips!

Karma Guard posted:

One way to put it is 'play it like a Megaten game'. :v:

Item Drops: When you're low on health, the enemies start dropping them more. Same thing with Vera and Risk. At least, I've noticed this.

Items: When the game gives you a certain elemental gem, there's going to be a fight against the opposite one. Listen to the game.

Boxes: Always keep a Crossbow on hand, and some Snowfly Draughts. Whichever ones make you go faster. The first lets you destroy boxes at a distance, and the second lets you make farther jumps (almost a block farther; enough to mantle them).

Damage: The enemies take damage like you do. Attack the heads of casters, and the weapon-bearing arms of attackers. This is especially true with Liches, those damn teleporting bastards. :argh:

Magic: The only reason you should hold onto Grimores is because learning a spell gives you a free shot of them.

Pretty much exactly the opposite of what I said in the first post but the game is quite flexible so do whichever suits you best!

happy lolidayz posted:

I guess I said this in the first post (good post btw) but I am expanding on it here because it is important. Here is a great tip for newbies if you find yourself getting frustrated or even thinking too much about the future of your weapons:

You really only need 3 weapons total. One edged, one piercing, and one blunt. Weapon type is by far the most important thing to consider: Enemy class (like beasts and dragons and shit) matters much much less than just about any other factor, and elemental affinity (which can be crucial important) can be put on with gems or spells.

So don't go into the game thinking "Okay this is gonna be my Human sword and my Dragon spear and my Beast crossbow" or whatever, because you're just setting yourself up for frustration, since not all enemy classes are all weak to the same weapon type. Most Humans in particular usually switch up their weaknesses on each enemy and there's no way to tell what they're weak to without checking or memorizing them all like "okay the crimson blade holding a spear in this specific map is weak to blunt." This requires much less grinding for weapons, less tedious weapon switching, and is surprisingly a lot more effective than having one weapon per enemy type. And usually you'll find you build up enemy points anyway because you're generally gonna be whacking skeletons with your mace and fighting wolfs with your spear or sword. But even if you don't it doesn't matter because even if you obsessively max your enemy class affinity you're only doing a few extra points of damage.

Which specific ones you choose don't really matter as long as you have all three. I will say though that shields are pretty dang useful because of the gems you get and that two-handed weapons aren't that much more powerful than one-handed weapons. In my current game I'm using a one-handed edged sword, a one-handed blunt mace, and a two-handed piercing spear. I guess dagger would be technically better for piercing but I just think spears are cool (kind of hard to chain though), and there's not a lot of piercing dagger blades.

You may want to bring a silver weapon along too though for special circumstances. The silver dagger you get very early in the game is a great choice. Not only does it cut through just about any undead enemy like butter, it's also got pretty useful break arts so you can do light elemental damage in more than one weapon type damage. But if you accidentally threw away your silver dagger that's okay you can probably deal just fine. Another weapon you might want to consider is a staff of some sort for those moments where you need that extra few percent to get off a magic attack with reassuring accuracy - I think the first staff you get is silver.

edit: Oh and this has nothing to do with anything but use grimoires first chance you get. They take away your MP anyway even if you're just using the item so it's no use holding on to it for when you think you might need a free casting.

And if you're insane:

Memecoleous posted:

Fun little tactic:

Think you've got good enough reflexes to nail every opportunity to use a defense ability? Too lazy to deal with Risk and weapon management? Try this out.

Among the chain abilities you get access to is Crimson Pain. This ability does damage proportional to how LITTLE health you have in comparison to your max HP. What does this mean? Unlike the ever popular Heavy Shot, which does 60% of the damage of the initial hit, Crimson Pain will do the same amount of damage even if the initial hit MISSES. Crimson Pain becomes available for acquisition after you get four other chain abilities. Basically, this means that faily early on you can run around perpetually near death and do pretty good damage per hit, regardless of Risk.

But Memecoleous, you might ask, lingering at 10 HP is just asking to get killed! This is where those fast reflexes come into play. There are two immensely useful defense abilities, Absorb Damage and Absorb Magic, which I believe are readily available to acquire from the start. What do these two defensive abilities do? They restore 50% of the damage received from either physical damage or magical, respectively. Of course, you might be wondering, how is this useful if you get knocked down to 0 HP? Quite useful! You see, even when reduced to 0 HP, you won't die until the enemy's attack and your defensive ability usage, if any, is finished. What's especially interesting about this is that you can actually RECOVER HP this way. Say you're at 10 HP, and you get smacked for 52 damage. You're quick on that Absorb Damage button, though, and you receive 50% of the damage back as health. So you go from 10 HP to 26 HP! How crazy is that?

This scheme effectively lets you hit for good damage regardless of Risk or whether or not you land the first hit, and provided you're not a total fuck up on hitting the right Absorb defensive ability when the exclaimation point pops up, you're invincible. This can't be considered game breaking, as your ass is probably just as likely to get smoked early on when you're still getting used to the timing (and when you're trying to acquire the necessary abilities in the first place), so it's more of an alternative strategy.

How effective is this? I've flown through the game on a fresh save in four hours using only the starting sword, Fandango. No workshops, no tedious weapon switching, no pauses to use Vera items or let my Risk decrease naturally. I saved a shitload, of course, because even with good reflexes you're bound to get caught off guard by a long ass spell animation that fucks with your timing, or you hit the wrong defensive ability, or you get hit with one of the rare attacks that neither Absorb ability can counter. It happens. But if you're willing to risk dying and reloading a lot by putting your faith in your reflexes and not your weapon load outs, it effectively lets you ignore all the micromanaging that is such a hated feature of the game. Personally, I love tweaking my weapons and having a keen eye to detail, but I like imposing arbitrary limitations on what I can do in a game to extend its replay value, and this is a convenient way to get around cutting myself off from workshops and new weaponry.

Give it a shot if you're up to it.

sirchode fucked around with this message at Dec 16, 2006 around 11:44